The short answer
Organize a shed in zones: big wheeled items by the door, hand tools on the walls, rarely used things overhead. Shelves and hooks hang on the studs, which the designer draws at 16 or 24 inches on center, and propane tanks stay outside, since Blue Rhino says indoor storage in sheds is never recommended.
Good shed organization ideas start before the shed exists. Where you put the door, how wide you make it, where the windows go and how far apart the studs are all decide how well the inside will store things. Shelves are easy to add later; a door on the wrong wall is not.
This guide gives you a layout method for shed storage, ideas that fit the framing, and the short list of things that should not be stored in a shed at all. When you are ready to draw your own, the shed designer lets you move the door and windows on every wall.
Shed organization ideas by zone
The simplest system that lasts is zoning by frequency of use. Things you grab every week go closest to the door. Things you use once a season go farthest away or highest up.
Zone 1: the door and the floor
Wheeled and heavy items live on the floor, nearest the door: the mower, the wheelbarrow, a snow blower, bikes. You should be able to roll them out without moving anything else. Our lawn mower storage shed guide covers door widths and ramps for riding mowers.
Zone 2: the walls at reach height
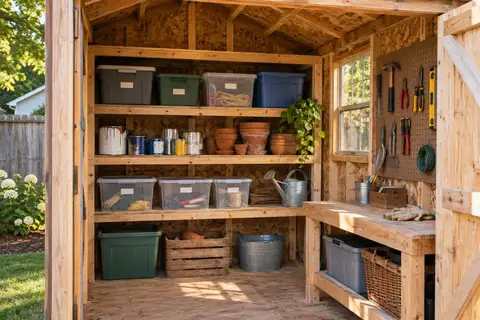
Hand tools, long-handled tools, extension cords and hoses go on the walls between knee and head height. This is the most valuable storage in any shed, so do not block it with boxes stacked on the floor.
Zone 3: high shelves and overhead
Holiday decorations, spare tiles, camping gear and anything you touch once a year go up high. On a gable roof the space above the wall plates is free storage if you plan for it. A shed loft turns that space into a real deck.
Keep a center lane
Whatever the size, keep a clear path from the door to the back wall. A shed you have to climb into gets disorganized within a month.
Shed storage ideas that fit the framing
Everything you hang in a shed hangs on the framing, so the framing should be planned with storage in mind.
Mount to studs, not siding
Panel siding alone will not hold a loaded shelf. Screw shelf brackets, rails and hooks into the studs. The designer frames walls at 16 inches on center by default, with 24 inches as an option. At 16 inches you have more places to fasten; at 24 inches you save studs but shelves need longer cleats.
Add blocking where heavy things go
Before you sheath the walls, add horizontal 2x4 blocking between studs at the heights where you plan shelves, a workbench or a tool rail. Blocking gives you a solid line to screw into anywhere along the wall, not just every 16 inches.
Use the wall plates and rafters
Open rafters or truss bottom chords above the walls can carry light items on hooks or slide-in racks. Keep heavy loads off them unless the plan is drawn for a loft. The designer’s default gable wall is 88-3/4 in tall, so a shelf at plate height sits about 7 ft 4-3/4 in above the floor deck, high enough to walk under.
Pick a storage system per wall
Give each wall one job and one system, so the shed reads at a glance:
- A shelf wall for bins and boxes, fixed to the studs.
- A rail and hook wall for tools that change, because hooks slide.
- Pegboard above a workbench for small tools, not heavy ones.
- Freestanding racks where you may rearrange, tied to a stud so they cannot tip.
The building side, with ledger shelves, stud bay shelves and French cleats cut to the designer’s framing, is in our shed shelving ideas guide.
Plan the door and windows for storage
The door and windows decide how much wall you can actually use.
Door on the long wall or the gable end
A door on the gable end leaves both long walls free for shelves, which suits a narrow shed. A door in the middle of a long wall gives you two storage halves, one each side, which suits a wide, shallow shed. Try both in the designer before you settle.
Make the door wide enough for the biggest item
Measure the widest thing you will roll in, usually a riding mower or a wheelbarrow with its handles, and size the door to it with a hand’s width to spare. A double door is the easy fix; see our shed door guide for the framing.
Windows above storage height
A window costs wall space. Put windows high, above the shelf line, or on the gable end, so you get light without losing hanging room. The shed windows guide covers sizes and rough openings.
Shed organization ideas by size
How you organize depends on how much floor you have. The designer’s presets give the floor area of each common size.
8x10 and smaller
An 8x10 gable shed has 80 sq ft. Use one long wall for shelves, the other for rails, the back wall for long-handled tools, and the floor by the door for the mower. If you are deciding whether 8x10 is big enough, our guide on what fits in an 8x10 shed lists it item by item.
10x12
A 10x12 gable shed has 120 sq ft. That is enough to add a workbench under the window on one wall while keeping a full shelving wall opposite and parking space by the door.
12x16 and up
A 12x16 has 192 sq ft. Here you can split the shed into a storage half and a work half, with the door between them. For bikes, look at our bike shed plans, which keep bikes on their own wall.
Workbench, potting and bike corners
A shed that only stores things fills up. A shed with one working corner stays usable, because you keep that corner clear to work.
A workbench under the window
Put the bench under a window so you work in daylight. Fix it to the studs along the back edge and give it legs at the front, so it does not rack. A shelf under the bench holds power tools in their cases, and a rail above it holds the hand tools you reach for most. Keep an outlet plan in mind if you will add power later.
A potting corner
If the shed doubles as a garden shed, give potting its own corner near the door, with a bench at waist height, bins for soil and a hook for the hose. Soil and water make a mess, so keep that corner away from tools that rust and paper that stains. Our potting shed plans show a layout built around a bench.
Bikes on the wall
Bikes take less room hanging than standing. Wall hooks screwed into studs let you park bikes vertically, front wheel up, side by side along one wall. Leave enough depth in front so you can lift a bike off without hitting the opposite shelves.
Bins, labels and the small stuff
Small items cause most of the clutter in any shed. A system for them keeps the walls and floor clear.
Clear bins on fixed shelves
Use bins of one size on shelves spaced to fit them. You can see what is inside, they stack, and they slide out like drawers. Label the front with a marker or a printed tag.
Magnetic strips and jars
A magnetic strip above the bench holds bits, drivers and small blades. Screw jar lids to the underside of a shelf and twist the jars on for screws and nails, so you can see the sizes at a glance.
A spot for the long stuff
Rakes, shovels, lumber offcuts and pipe need a corner rack or a pair of brackets high on a wall. Long items left leaning against a wall always end up across the floor.
What not to store in a shed
Some things are better stored elsewhere, no matter how well organized the shed is.
Propane cylinders
Blue Rhino, the cylinder exchange company, says: “Indoor storage, including garages, basements, or sheds, is never recommended.” It also says to keep tanks upright and store them in a shaded, cool and well-ventilated outdoor area (Blue Rhino, read November 2026). Keep grill tanks outside the shed, on a firm level spot away from the door.
Fuel and chemicals
If you store gasoline for the mower, keep it in a container made for fuel, away from any spark source, and out of direct sun. Pool chemicals, fertilizers and pesticides should be stored according to their labels, separated from each other, and kept off the floor where water collects. Read the label on each product: it is the instruction that applies.
Things that freeze, cook or get chewed
An uninsulated shed follows the outdoor temperature. Paint, glue and caulk can be ruined by freezing; electronics and batteries do not like heat; paper, fabric and pet food attract mice and moisture. If you need to store these, plan insulation and ventilation, or keep them indoors.
Keep it organized
Organization fails when items have no home. Label shelves and bins, keep a hook for every long tool, and do a five minute reset when you put the mower away. Once a year, empty the floor zone completely and check for damp, pests and anything that no longer belongs there.
Draw your storage in
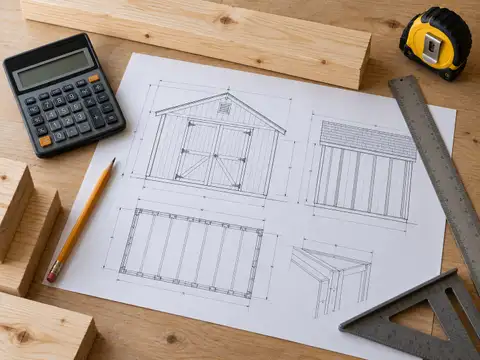
Before you build, draw your door, windows and wall heights in the shed designer and mark which walls are for shelves. The designer does not draw shelving, but its wall drawings and cut list show every stud, so you can plan your blocking and brackets against the real framing. Start from the 8x10 or 10x12 plan and adjust from there.